How to Make Tongue and Groove Joint – A Step-by-Step Guide 2024

Tongue and groove joints are a classic woodworking technique used to join boards together seamlessly. Whether you’re crafting flooring, paneling, or cabinetry, mastering the art of tongue and groove is essential for achieving professional results. In this guide, we’ll walk you through the process step by step, from selecting the right materials to putting the finishing touches on your project.
What are Tongue and Groove Joints?

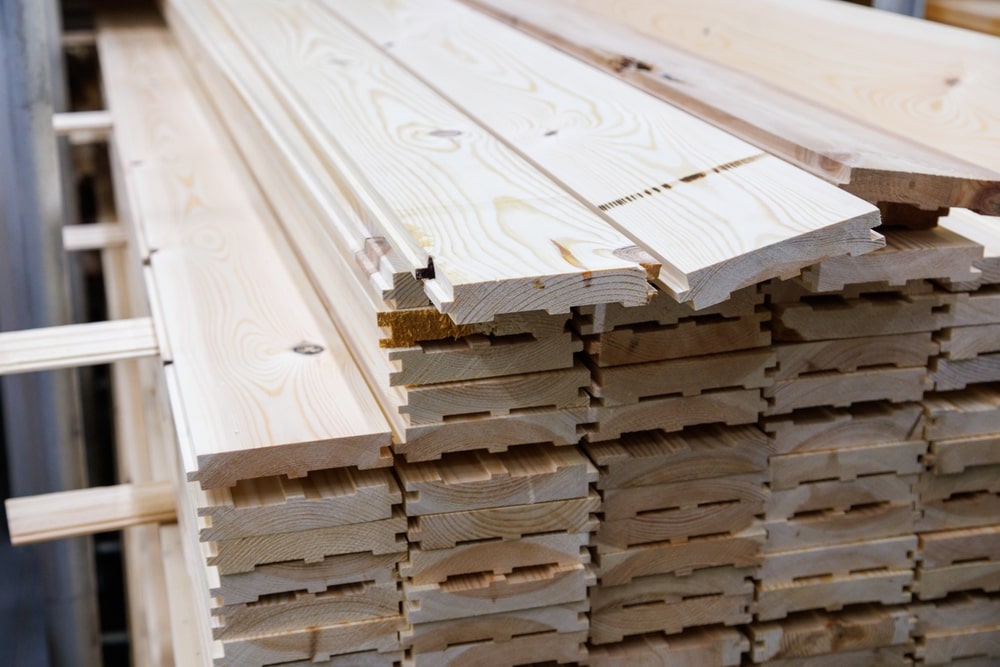
Tongue and groove joints consist of two interlocking profiles: one with a protruding tongue along one edge and the other with a corresponding groove. When fitted together, these profiles create a strong, seamless connection that enhances both the aesthetics and structural integrity of your woodworking projects.
Before diving into the construction process, it’s crucial to gather the necessary materials and tools. Start by selecting high-quality wood species suited to your project’s requirements, ensuring straight, knot-free boards for optimal results. Additionally, you’ll need a table saw or router equipped with a tongue and groove bit, safety gear, clamps, glue, and sanding supplies.
Tools Needed
Following are the tools needed for this task and project.
Table Saw or Router: Used for cutting the tongue and groove profiles into the wood.
Tongue and Groove Bit: A specialized router bit for cutting the profiles if using a router.
Safety Gear: Including safety goggles, ear protection, and a dust mask to ensure a safe working environment.
Clamps: Used to hold the boards together while gluing and assembling the joints.
Wood Glue: High-quality wood glue for bonding the tongue and groove joints.
Measuring Tools: Such as a tape measure, ruler, or calipers for measuring and marking the dimensions of the joints.
Marking Tools: Such as a pencil or marking knife for marking the locations of the cuts.
Sandpaper: Various grits of sandpaper for smoothing the surfaces of the joined boards.
Sawdust Collection System: Optional but recommended for keeping your workspace clean and free of debris.
Workbench or Sawhorses: Providing a stable surface for cutting and assembling the joints.
Damp Cloth: For wiping away excess glue during assembly.
Finishing Supplies: If desired, including wood stain, varnish, or paint for applying a finish to the wood.
Step by Step Guide to make Tongue and Groove Joints
Let us cover all the steps involved in the process of making tongue and groove Joints and providing an easy and comprehensive guide for you.
Select Your Materials: Choose high-quality wood that is straight, knot-free, and suitable for your project.
Prepare Your Tools: You will need a table saw or router with a tongue and groove bit, safety gear (goggles, ear protection, dust mask), clamps, glue, and sanding supplies.
Measure and Mark: Measure and mark the dimensions for your tongue and groove joints on the wood.
Set Up Your Workspace: Ensure your workspace is clean, well-lit, and organized. Set up your tools and materials within easy reach.
Adjust Your Table Saw or Router: Set your table saw or router to the correct settings for cutting the tongue and groove profiles.
Cut the Grooves: Use the table saw or router to cut the grooves along one edge of each board. Make sure the depth and width of the grooves are consistent.
Cut the Tongues: Adjust the settings on your table saw or router to cut the tongues on the mating edges of the boards. Again, ensure consistency in depth and width.
Dry Fit the Joints: Test-fit the tongue and groove joints together without glue to ensure they fit snugly. Make any necessary adjustments.
Apply Glue: Apply wood glue to the mating surfaces of the tongue and groove joints.
Assemble the Joints: Fit the tongue and groove joints together, applying gentle pressure to ensure a tight bond.
Secure with Clamps: Clamp the boards together securely to hold the joints in place while the glue dries. Wipe away any excess glue with a damp cloth.
Allow to Dry: Leave the clamped boards to dry for the recommended time according to the glue manufacturer’s instructions.
Sand the Surface: Once the glue is dry, sand the surface of the joined boards smooth to remove any rough edges or imperfections.
Apply Finish (Optional): Apply a finish to the wood to enhance its appearance and protect it from damage. Allow the finish to dry completely.
Inspect Your Work: Once everything is dry, inspect your tongue and groove joints to ensure they are strong, seamless, and free of gaps.
Safety Precautions in Making Tongue and Groove Joint
Now let’s discuss some safety precautions in making the process of tongue and groove joints
Wear Safety Gear: Always wear appropriate safety gear, including safety goggles to protect your eyes from flying debris, ear protection to prevent hearing damage from loud tools, and a dust mask to avoid inhaling wood dust.
Read Instructions Properly: Familiarize yourself with the operation and safety guidelines of your tools, including the table saw or router, before use. Follow the manufacturer’s instructions carefully.
Maintain a Clean Workspace: Keep your workspace clean and organized to prevent accidents caused by tripping over clutter or having tools and materials scattered about.
Secure Workpieces: Use clamps or other securing devices to hold workpieces firmly in place while cutting and assembling the joints. This helps prevent kickback and ensures accurate cuts.
Use Proper Technique: When operating power tools like the table saw or router, maintain a steady grip and feed the workpiece through the blade or bit with smooth, controlled movements. Avoid rushing or forcing the wood through the tool.
Keep Hands Clear: Always keep your hands and fingers well clear of the cutting area when using power tools. Use push sticks or other safety devices to guide the wood through the tool if necessary.
Mind Your Surroundings: Be aware of your surroundings and the location of others in the workspace to prevent accidents caused by collisions or distractions.
Inspect Tools Regularly: Before each use, inspect your tools for any signs of damage or wear. Replace or repair damaged parts as needed to maintain safety and performance.
Follow Glue Safety Guidelines: When using wood glue, follow the manufacturer’s instructions for application and cleanup. Avoid contact with skin and eyes, and work in a well-ventilated area to minimize exposure to fumes.
Read More Guides:- How to Square Boards with Woodworking Hand Tools
Also you should Read:- How to Make a Wooden Ladder: Best Informative Guide 2024
FAQs (Frequently Asked Questions)
1. Can I use tongue and groove joints for outdoor projects?
Ans, While tongue and groove joints can provide a strong, seamless connection, they may not be suitable for outdoor applications exposed to the elements. Consider alternative joinery methods or use treated lumber for outdoor projects.
2. Do I need specialized tools to create tongue and groove joints?
Ans. While a table saw or router equipped with a tongue and groove bit is ideal for cutting the profiles, you can achieve similar results with hand tools like a dado plane or plow plane.
3. How do I prevent gaps in tongue and groove joints?
Ans. Achieving a tight, gap-free fit requires careful attention to detail during the milling and fitting process. Take your time and make precise cuts to ensure a seamless connection.
4. Can I use tongue and groove joints for curved or irregular surfaces?
Tongue and groove joints are best suited for flat or straight-edged boards. For curved or irregular surfaces, consider alternative
Final Thoughts
Coming towards conclusion, we have highlighted al lthe essential toolsand steps needed to make tongue and groove joints. Mastering the art of tongue and groove opens up a world of possibilities for woodworking enthusiasts, and provide you opportunities to excel in this field. By following the step-by-step guide outlined above and exercising patience and precision, you’ll be well on your way to crafting professional-quality pieces that stand the test of time. So, roll up your sleeves, dive into your next project, and let your creativity shine with the skills of woodworking


